

Machai MCP Server

Introduction
Machai MCP Server is a Java implementation of the Model Context Protocol that exposes Machai-powered functional tools to MCP-compatible clients. It is designed to let teams publish AI-enabled tools through a single server process while keeping the core runtime small, extensible, and easy to integrate.
The project combines dynamic tool discovery, MCP transport implementations, and runtime configuration in one package. It supports both local STDIO-based integrations and network-accessible HTTP deployments, making it suitable for desktop assistants, local automation, remote tool gateways, and internal AI platforms.
Key benefits include:
- pluggable tool loading through Java SPI, so custom tool jars can be added without recompiling the server
- support for both STDIO and HTTP MCP transports from the same application entry point
- prompt and tool exposure for MCP clients, including streamable HTTP sessions when needed
- straightforward Java packaging and deployment using Maven
Overview
Machai MCP Server starts from a single command-line entry point that decides whether the application should run as a STDIO server or as an HTTP server. In both modes, it builds MCP server capabilities, discovers functional tools from the classpath, adapts them into MCP tool definitions, and exposes them to connected clients.
The runtime centers on a generic adapter that translates Machai function tools into MCP-compatible schemas, call handlers, and prompt definitions. HTTP deployments additionally wrap the MCP server in a Jetty-based servlet container, while STDIO deployments use standard input and output for local process integration.
The following diagram shows the high-level component structure and relationships within the project:
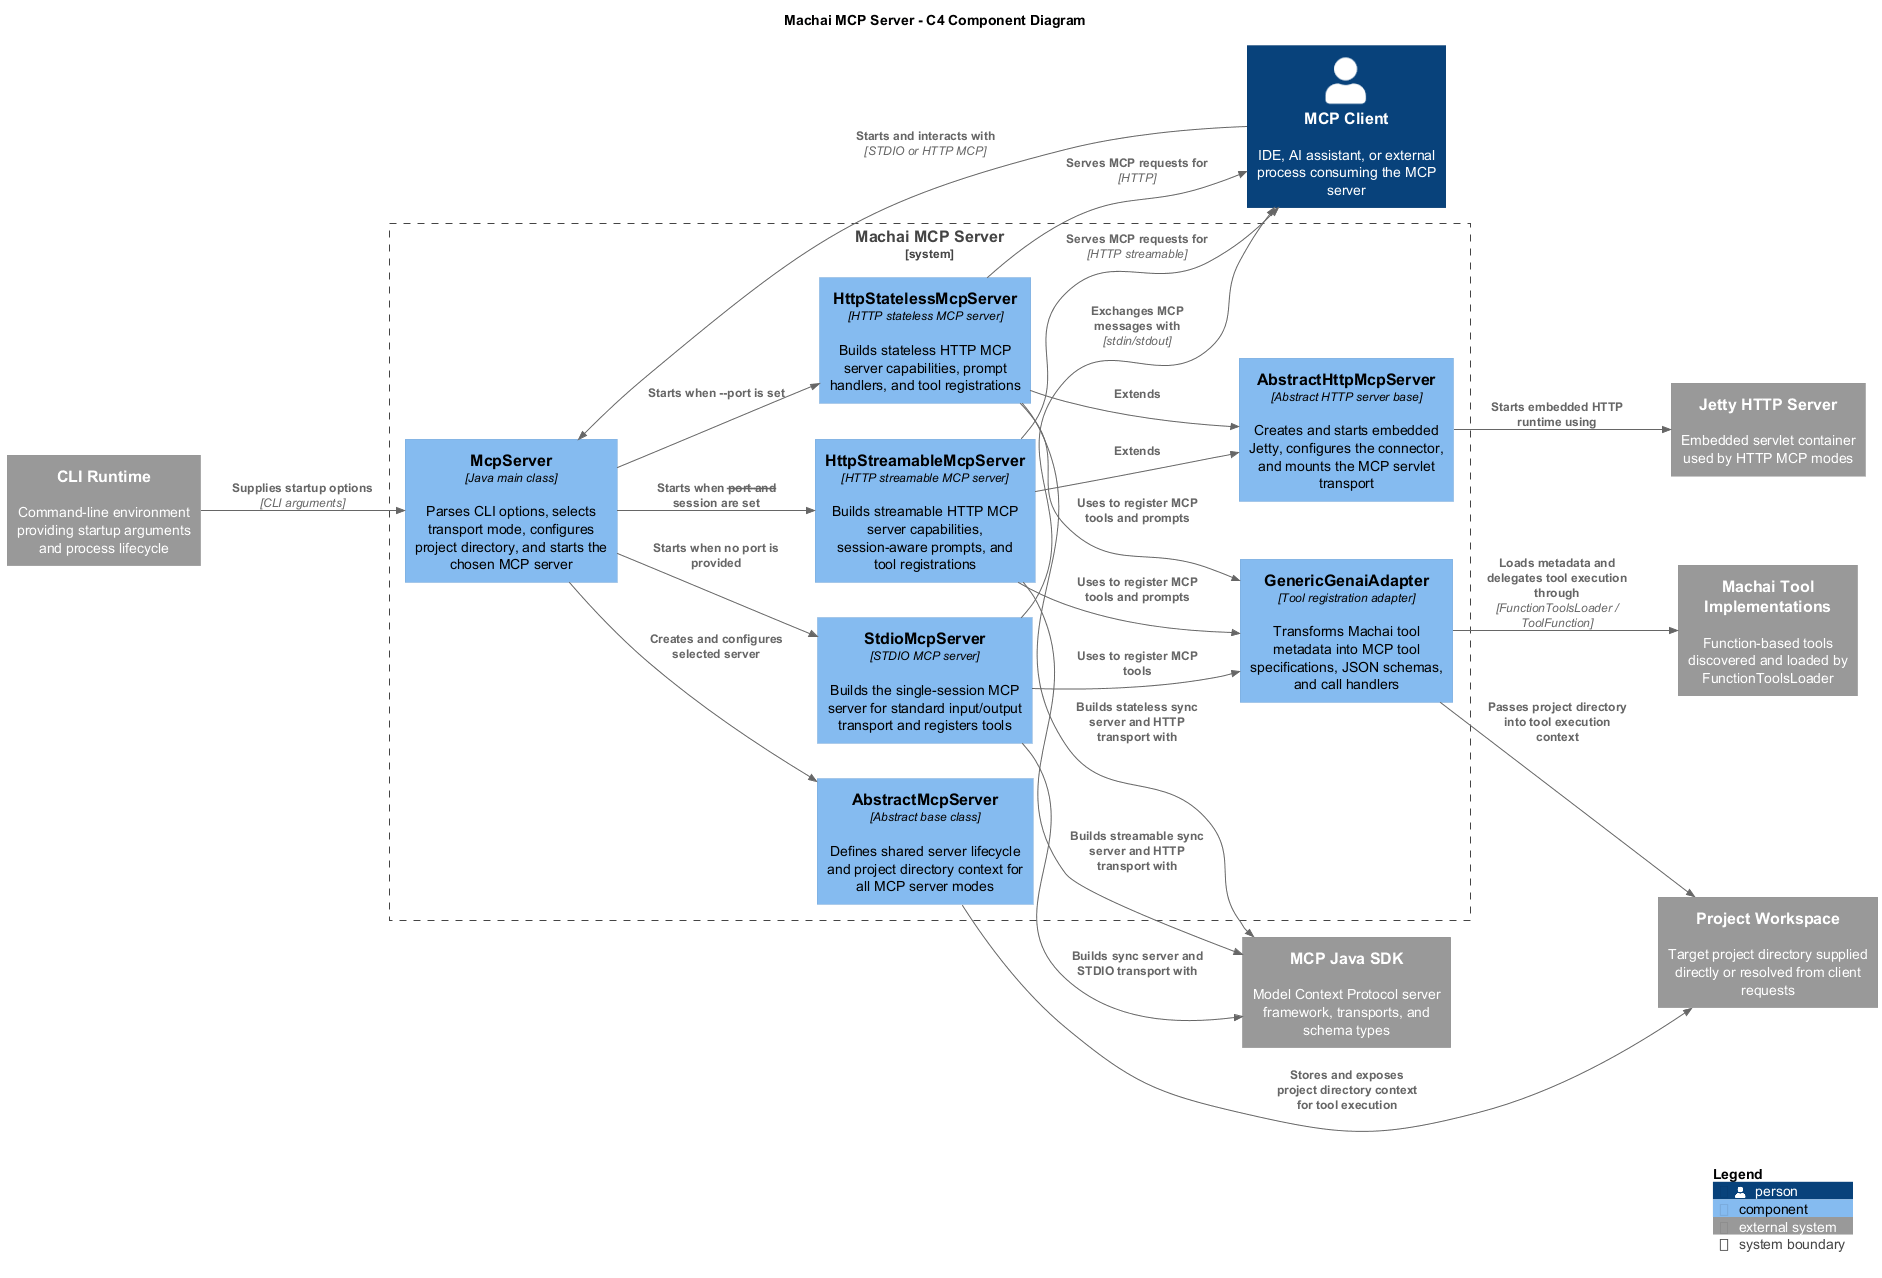
At a high level, the project consists of:
- a bootstrap layer that parses command-line options and selects the transport mode
- transport-specific server implementations for STDIO, stateless HTTP, and streamable HTTP
- a shared server abstraction that carries common metadata and project-directory handling
- an adapter layer that converts discovered functional tools into MCP tools and prompts
- Jetty-based HTTP hosting for remote access when running in web mode
Key Features
- Runs as either a STDIO MCP server or an HTTP MCP server from the same executable
- Supports stateless HTTP mode and streamable HTTP mode for session-aware clients
- Loads custom functional tools from user-provided jars through Java SPI discovery
- Converts Machai tool metadata and parameter definitions into MCP tool schemas automatically
- Exposes both tools and prompts to compatible MCP clients
- Allows optional project directory injection for tool execution context
- Provides Maven-based packaging, including an assembly profile for a runnable jar with dependencies
Getting Started
Prerequisites
Before running Machai MCP Server, ensure you have:
- Java 17 or newer, matching the
maven.compiler.releasevalue inpom.xml - Maven, if you plan to build the project from source
- at least one Machai-compatible functional tool jar available on the runtime classpath
- any environment variables required by the loaded tools or upstream AI providers, such as model names and provider credentials
- network access if you plan to run the HTTP server mode or connect to remote AI services
Build
To build the project from source:
mvn clean package
To create the packaged distribution jar with dependencies using the assembly profile:
mvn -Ppack install
CLI
Basic Usage
Run the server in STDIO mode by placing the server jar and your functional tool jar on the classpath:
java -cp /absolute/path/to/machai-mcp-server.jar:/absolute/path/to/functional-tool-container.jar org.machanism.machai.mcp.server.McpServer
Typical Workflow
- Build or download the Machai MCP Server artifact.
- Build your custom functional tool implementation jar with the required SPI registration.
- Place both jars on the Java classpath.
- Export any required environment variables for AI providers and tool configuration.
- Start the server in STDIO mode for local desktop integrations, or pass a port to run it over HTTP.
- Connect an MCP client and invoke the published tools and prompts.
Java Version
The project requires Java 17, as defined by the Maven compiler release. In practice, you also need a runtime environment that can access any configured AI backends and any custom tool dependencies present on the classpath.
Configuration
Command-Line Options
The application entry point defines the following options:
-h,--help: prints the available command-line options-d,--projectDir <path>: sets the project directory that tools can use as execution context-n,--name <value>: overrides the MCP server name reported to clients-v,--version <value>: overrides the MCP server version reported to clients-p,--port <number>: enables HTTP server mode and binds the server to the specified port-s,--session: enables streamable HTTP MCP mode; this only applies when HTTP mode is active
If --port is omitted, the application starts in STDIO mode. If --port is provided, the application starts an HTTP server. When --session is added together with --port, the HTTP server uses the streamable transport; otherwise it uses the stateless transport.
Options Table
| Option | Description | Default |
|---|---|---|
-h, --help |
Show the help message and print available options. | Not enabled |
-d, --projectDir <path> |
Set the project directory used by tools as their working context. | Not set; may be determined from the client request in HTTP mode |
-n, --name <value> |
Set the MCP server name exposed to clients. | mcp-machai-server |
-v, --version <value> |
Set the MCP server version exposed to clients. | Implementation version from package metadata, or latest when unavailable |
-p, --port <number> |
Start the server in HTTP mode and listen on the given port. | Not set; STDIO mode is used instead |
-s, --session |
Use streamable HTTP MCP mode. Only meaningful together with --port. |
Disabled |
Example
The following example starts the HTTP server on port 45000, sets a custom server identity, provides a project directory, and enables streamable sessions:
export gw_model=CodeMie:gpt-5.4-2026-03-05
export embedding_model=CodeMie:text-embedding-005
export GENAI_USERNAME=your_username
export GENAI_PASSWORD=your_password

java -cp /absolute/path/to/machai-mcp-server.jar:/absolute/path/to/functional-tool-container.jar org.machanism.machai.mcp.server.McpServer \
  --projectDir /absolute/path/to/project \
  --name my-mcp-server \
  --version 1.0.0 \
  --port 45000 \
  --session
Publishing Function Tools from User JAR Files
To publish your own functional tool implementation:
- Implement the tool according to the Machai Functional Tools SPI documentation.
- Package the implementation into a jar with the required
META-INF/servicesregistration. - Add both the server jar and your custom tool jar to the runtime classpath.
- Start the server and let it discover and register the tool automatically.
- Connect with an MCP client and call the published tool through the exposed MCP interface.
See the full guide here: Machai Functional Tools SPI documentation
STDIO MCP Server
Claude Desktop Configuration
{
  "mcpServers": {
    "stdio-mcp-server": {
      "command": "java",
      "args": [
        "-cp",
        "/absolute/path/to/your/machai-mcp-server.jar:/absolute/path/to/your/functional-tool-container.jar",
        "org.machanism.machai.mcp.server.McpServer"
      ],
      "env": {
        "gw_model": "CodeMie:gpt-5.4-2026-03-05",
        "embedding_model": "CodeMie:text-embedding-005",
        "GENAI_USERNAME": "your_username",
        "GENAI_PASSWORD": "your_password"
      }
    }
  }
}
HTTP MCP Server
Start MCP Server
export gw_model=CodeMie:gpt-5.4-2026-03-05
export embedding_model=CodeMie:text-embedding-005
export GENAI_USERNAME=your_username
export GENAI_PASSWORD=your_password
export BINDEX_REG_PASSWORD=your_bindex_password

java -cp /absolute/path/to/your/machai-mcp-server.jar:/absolute/path/to/your/functional-tool-container.jar org.machanism.machai.mcp.server.McpServer --port 45000
Claude Desktop Configuration
{
  "mcpServers": {
    "localMcpServer": {
      "command": "npx",
      "args": [
        "mcp-remote",
        "http://localhost:45000/mcp"
      ]
    }
  }
}
Testing
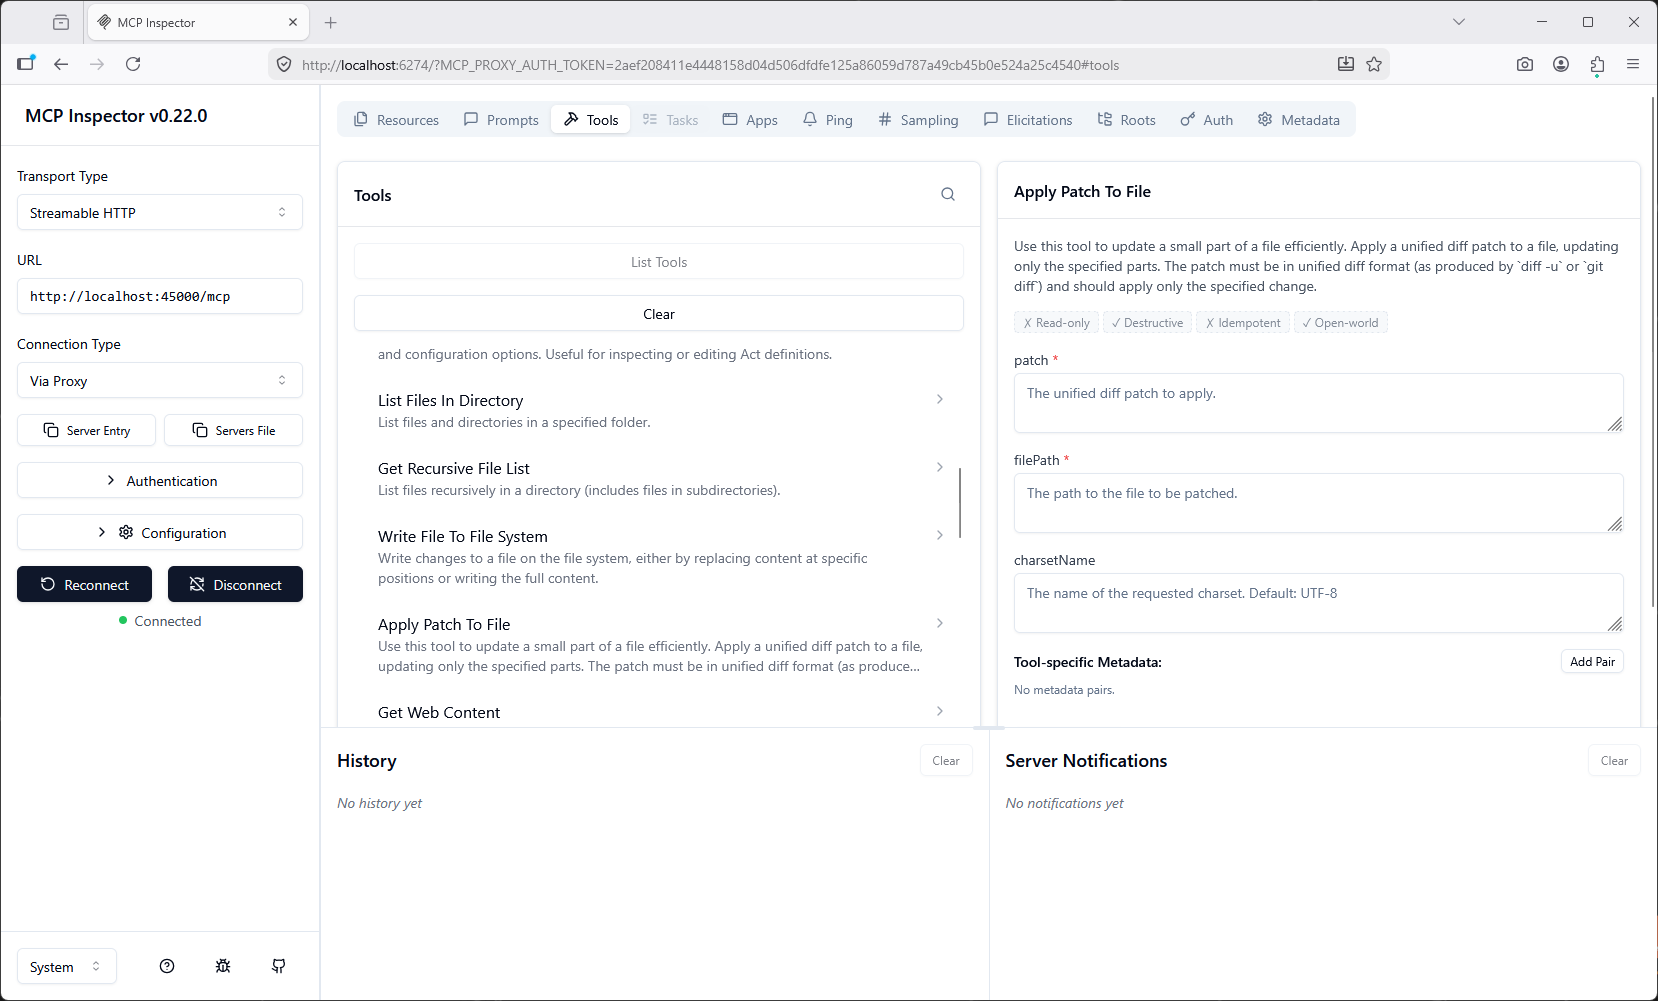
MCP Inspector
The MCP Inspector is useful for validating tool registration, prompt exposure, and runtime behavior while developing or integrating the server. For long-running tool calls, you can increase the request timeout so the inspector does not fail early.
See: MCP Inspector
Example with a 5-minute timeout:
npx @modelcontextprotocol/inspector
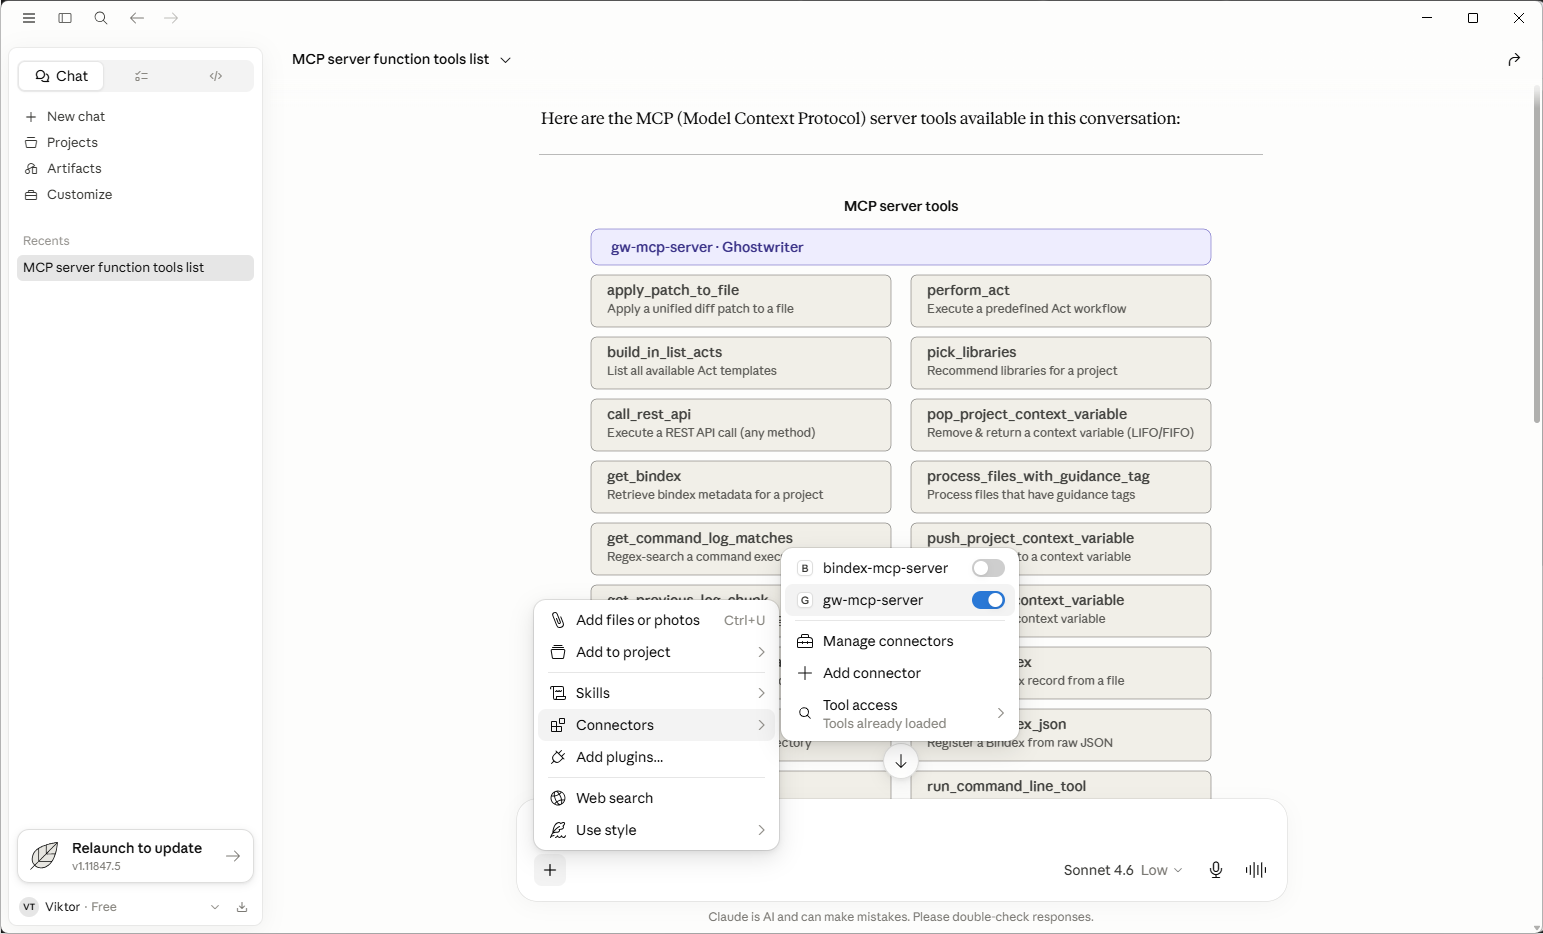
Claude Desktop
Claude Desktop is a practical client for connecting to both STDIO and HTTP deployments of the server. It is especially useful for validating end-user MCP integration, tool availability, and desktop-driven workflows.
See more: Desktop application
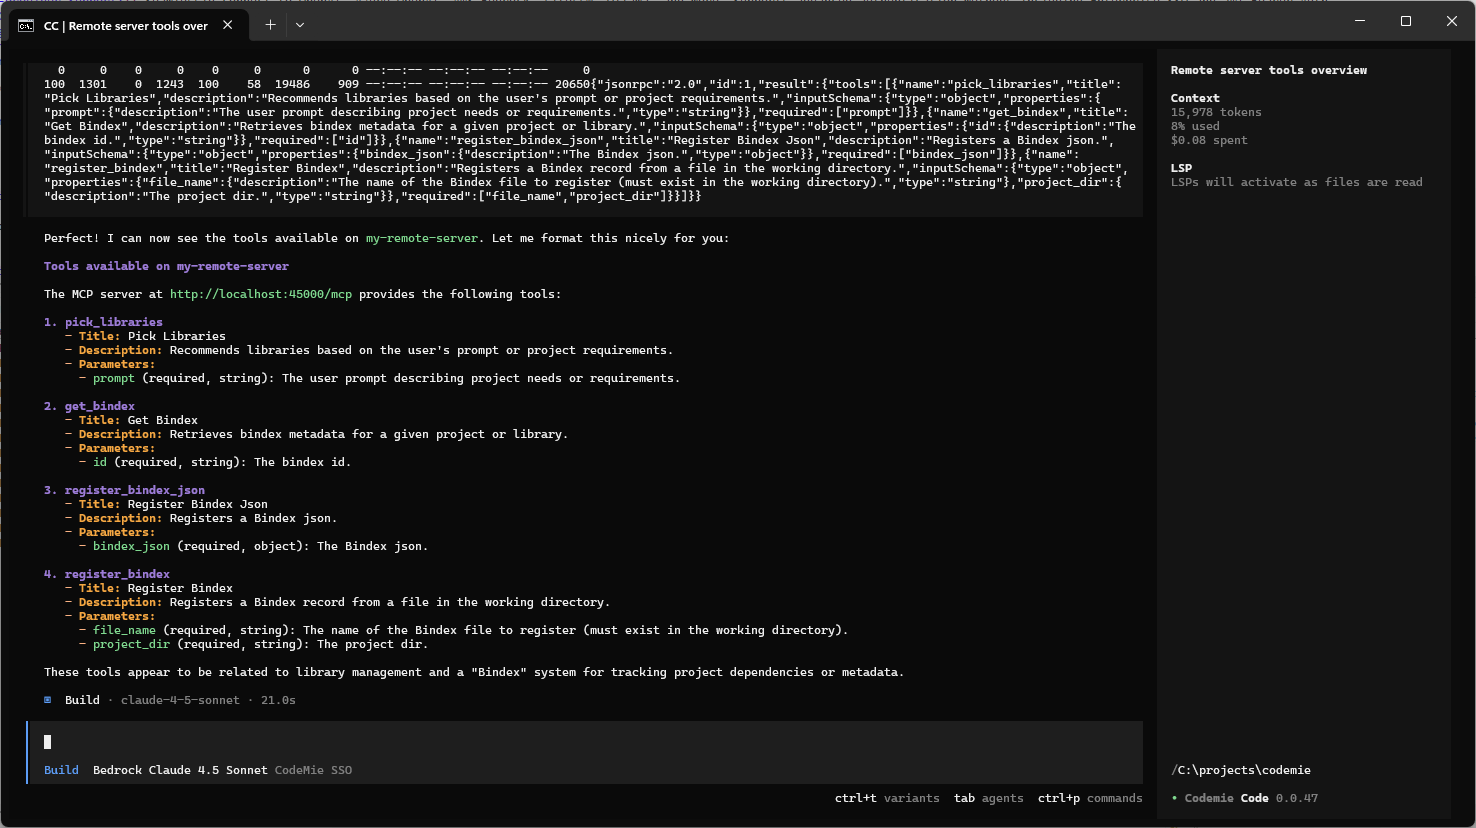
CodeMie Code
CodeMie Code is a Unified AI Coding Assistant CLI that empowers you to manage Claude Code, OpenAI Codex, Google Gemini, OpenCode, and custom AI agents—all from a single, powerful command-line interface.
Key Features:
- Unified Multi-Provider Support: Seamlessly connect to OpenAI, Azure OpenAI, AWS Bedrock, LiteLLM, Ollama, and more. Supports advanced authentication methods including Enterprise SSO and JWT Bearer Auth.
- Built-in LangGraph Agent: Leverage file operations, command execution, and planning tools directly from the CLI.
- Flexible Integration: Easily register and interact with MCP-compatible servers and custom AI agents.
- Cross-Platform: Works on Windows, Linux, and macOS for maximum developer flexibility.
- End-to-End Workflow Validation: Test tool registration, prompt exposure, and agent workflows directly from your terminal or code editor.
Setup Example:
-
Register your MCP server with the CodeMie proxy:
npx claude mcp add my-remote-server -- codemie-mcp-proxy "http://localhost:45000/mcp" -
Launch CodeMie Code:
npx codemie-code -
Connect and interact:
- Use the CLI to browse available tools, send prompts, and observe responses in real time across multiple AI providers.
Learn more: CodeMie Code documentation
Resources
- Official Machai platform: https://machai.machanism.org/
- Machai Functional Tools documentation: https://machai.machanism.org/genai-client/functional-tools.html
- Maven Central artifact: https://central.sonatype.com/artifact/org.machanism.machai/machai-mcp-server
- SourceForge releases: https://sourceforge.net/projects/machanism/files/machai/machai-mcp-server/releases/
- Model Context Protocol Inspector: https://modelcontextprotocol.io/docs/tools/inspector